Multiple Kubernetes Cluster Deployment
Note
The multicluster deployment described in this section, assumes you have deployed
the flyte-core Helm chart, which runs the individual Flyte components separately.
This is needed because in a multicluster setup, the execution engine is
deployed to multiple K8s clusters; it won’t work with the flyte-binary
Helm chart, since it deploys all Flyte services as one single binary.
Scaling Beyond Kubernetes
Tip
As described in the Architecture Overview,
the Flyte Control Plane sends workflows off to the Data Plane for
execution. The data plane fulfills these workflows by launching pods in
Kubernetes.
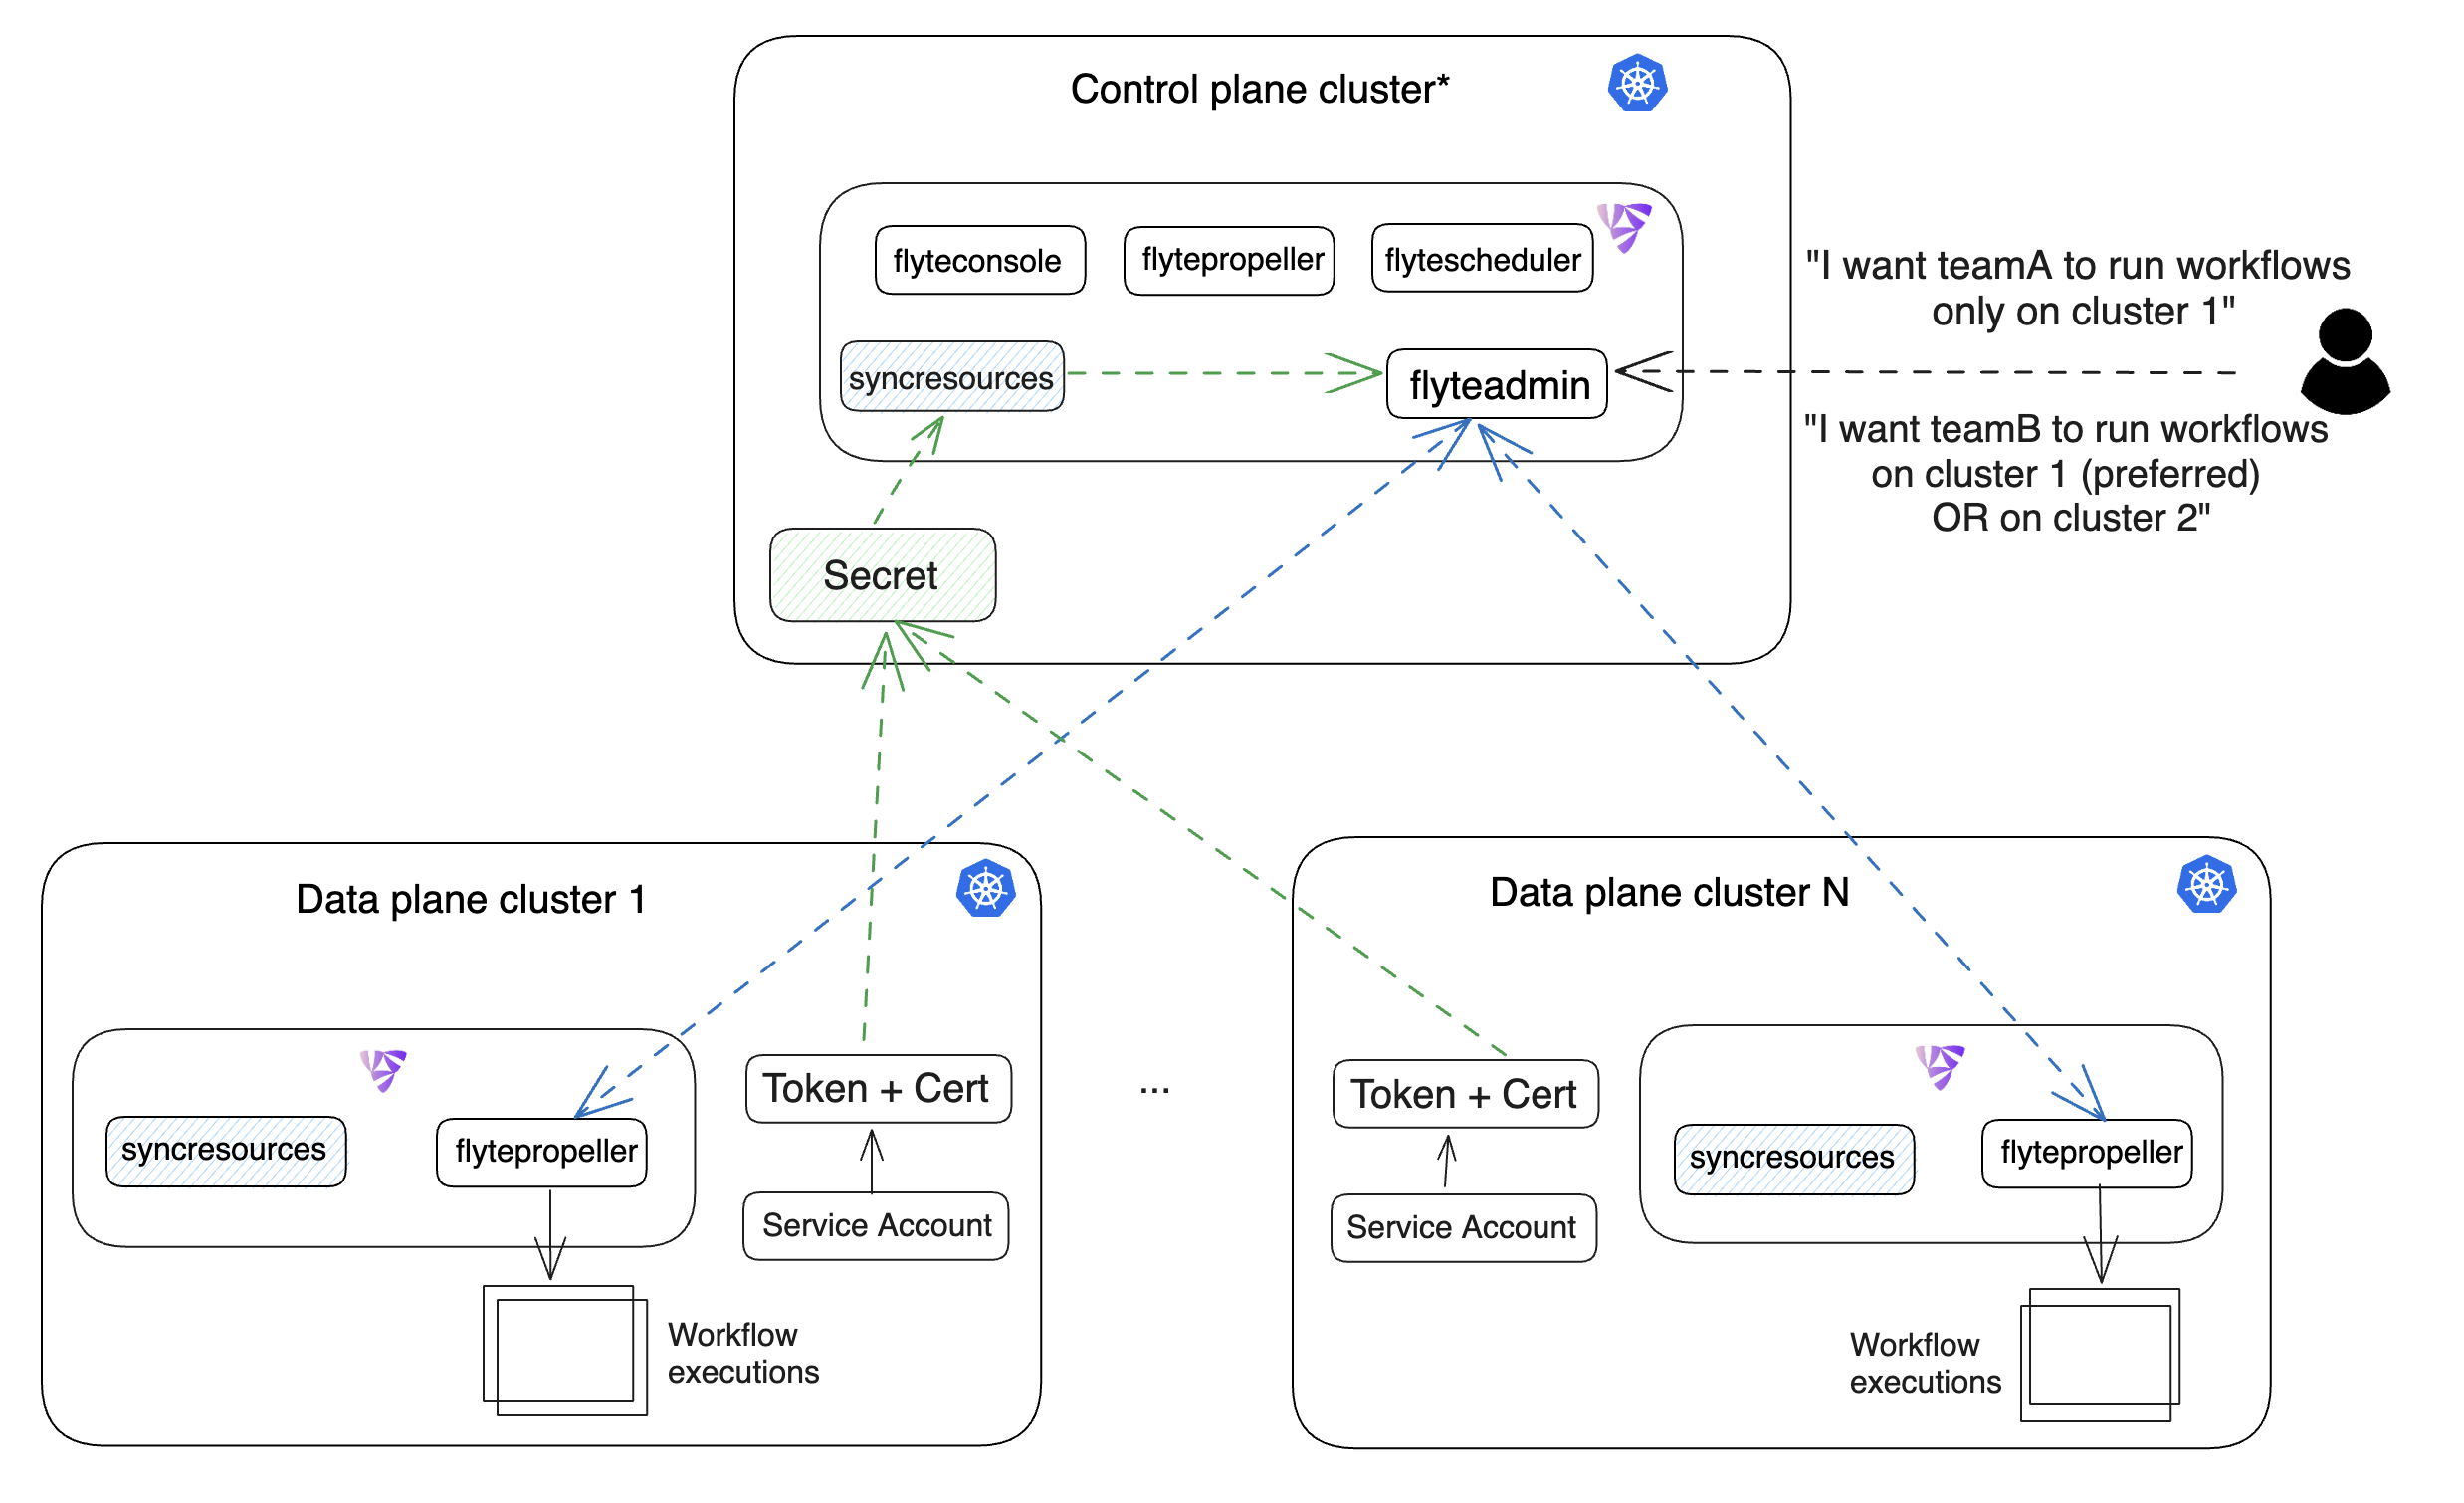
The case for multiple Kubernetes clusters may arise due to security constraints, cost effectiveness or a need to scale out computing resources.
To address this, you can deploy Flyte’s data plane to multiple Kubernetes clusters.
The control plane (FlyteAdmin) can be configured to submit workflows to
these individual data planes. Additionally, Flyte provides the mechanisms for
administrators to retain control on the workflow placement logic while enabling
users to reap the benefits using simple abstractions like projects and domains.
Prerequisites
To make sure that your multicluster deployment is able to scale and process requests successfully, the following environment-specific requirements should be met:
An IAM Policy that defines the permissions needed for Flyte. A minimum set of permissions include:
"Action": [
   "s3:DeleteObject*",
   "s3:GetObject*",
   "s3:ListBucket",
   "s3:PutObject*"
   ],
"Resource": [
         "arn:aws:s3:::<your-S3-bucket>*",
         "arn:aws:s3:::<your-S3-bucket>*/*"
      ],
Two IAM Roles configured: one for the control plane components, and another for the data plane where the worker Pods and
flytepropellerrun.
Note
Using the guidance from this document, make sure to follow your organization’s policies to configure IAM resources.
An OIDC Provider associated with each of your EKS clusters. You can use the following command to create and connect the Provider:
eksctl utils associate-iam-oidc-provider --cluster <Name-EKS-Cluster> --approve
An IAM Trust Relationship that associates each EKS cluster type (control plane or data plane) with the Service Account(s) and namespaces where the different elements of the system will run.
Follow the steps in this section to complete the requirements indicated above:
Control plane role
Use the following command to simplify the process of both creating a role and configuring an initial Trust Relationship:
eksctl create iamserviceaccount --cluster=<controlplane-cluster-name> --name=flyteadmin --role-only --role-name=flyte-controlplane-role --attach-policy-arn <ARN-of-your-IAM-policy> --approve --region <AWS-REGION-CODE> --namespace flyte
Go to the IAM section in your AWS Management Console and select the role that was just created
Go to the Trust Relationships tab and Edit the Trust Policy
Add the
datacatalogService Account to thesubsection
Note
When caching is enabled, the datacatalog service store hashes of workflow inputs alongside with outputs on blob storage. Learn more here.
Example configuration:
         {
   "Version": "2012-10-17",
   "Statement": [
      {
            "Effect": "Allow",
            "Principal": {
               "Federated": "arn:aws:iam::<ACCOUNT-ID>:oidc-provider/oidc.eks.<REGION>.amazonaws.com/id/<CONTROLPLANE-OIDC-PROVIDER>"
            },
      "Action": "sts:AssumeRoleWithWebIdentity",
      "Condition": {
         "StringEquals": {
            "oidc.eks.<REGION>.amazonaws.com/id/<CONTROLPLANE-OIDC-PROVIDER>:aud": "sts.amazonaws.com",
            "oidc.eks.<REGION>.amazonaws.com/id/<CONTROLPLANE-OIDC-PROVIDER>:sub": [
                  "system:serviceaccount:flyte:flyteadmin",
                  "system:serviceaccount:flyte:datacatalog"
                  ]
               }
            }
      }
   ]
}
Data plane role
Create the role and Trust Relationship:
eksctl create iamserviceaccount --cluster=<dataplane1-cluster-name> --name=flytepropeller --role-only --role-name=flyte-dataplane-role --attach-policy-arn <ARN-of-your-IAM-policy> --approve --region <AWS-REGION-CODE> --namespace flyte
Edit the Trust Relationship of the data plane role
Note
By default, every Pod created for Task execution, uses the default Service Account on their respective namespace. In your cluster, you’ll have as many
namespaces as project and domain combinations you may have. Hence, it might be useful to use a StringLike condition and to use a wildcard for the namespace name in the Trust Policy
Add the
defaultService Account:
Example configuration for one data plane cluster:
{
"Version": "2012-10-17",
"Statement": [
{
      "Effect": "Allow",
      "Principal": {
         "Federated": "arn:aws:iam::<AWS-ACCOUNT-ID>:oidc-provider/oidc.eks.<AWS-REGION-CODE>.amazonaws.com/id/<DATAPLANE1-OIDC-PROVIDER>"
      },
      "Action": "sts:AssumeRoleWithWebIdentity",
      "Condition": {
         "StringLike": {
            "oidc.eks.<AWS-REGION-CODE>.amazonaws.com/id/<DATAPLANE1-OIDC-PROVIDER>.:aud": "sts.amazonaws.com",
            "oidc.eks.<AWS-REGION-CODE>.amazonaws.com/id/<DATAPLANE1-OIDC-PROVIDER>.:sub": [
                  "system:serviceaccount:flyte:flytepropeller",
                  "system:serviceaccount:*:default"
            ]
         }
      }
}
Note
To further refine the Trust Relationship, consider using a StringEquals condition and adding the default Service Account only for the project-domain
namespaces where Flyte tasks will run, instead of using a wildcard.
Data Plane Deployment
This guide assumes that you have two Kubernetes clusters and that you can access
them all with kubectl.
Let’s call these clusters dataplane1 and dataplane2. In this section, you’ll prepare
the first cluster only.
Add the
flyteorgHelm repo:
helm repo add flyteorg https://flyteorg.github.io/flyte
helm repo update
# Get flyte-core helm chart
helm fetch --untar --untardir . flyteorg/flyte-core
cd flyte-core
Open the
values-dataplane.yamlfile and add the following contents:configmap: admin: admin: endpoint: <your-Ingress-FQDN>:443 #indicate the URL you're using to connect to Flyte insecure: false #enables secure communication over SSL. Requires a signed certificate catalog: catalog-cache: endpoint: <your-datacatalog-address> insecure: false
Note
This step is needed so the flytepropeller instance in the data plane cluster is able to send notifications
back to the flyteadmin service in the control plane.
The catalog service runs in the control plane and is used when caching is enabled. Note that catalog is
not exposed via the ingress by default and does not have its own authentication mechanism. The catalog service
in the control plane cluster can for instance be made available to the flytepropeller services in the data plane
clusters with an internal load balancer service (see e.g. GKE documentation
or AWS Load Balancer Controller).
if the clusters use the same VPC network.
Install Flyte data plane Helm chart:
Note
Use the same values-eks.yaml or values-gcp.yaml file you used to deploy the control plane.
helm install flyte-core-data flyteorg/flyte-core -n flyte \
--values values-eks.yaml --values values-dataplane.yaml \
--create-namespace
helm install flyte-core-data -n flyte flyteorg/flyte-core  \
      --values values-gcp.yaml \
      --values values-dataplane.yaml \
      --create-namespace flyte
Control Plane configuration
For flyteadmin to access and create Kubernetes resources in one or more
Flyte data plane clusters, it needs credentials to each cluster.
Flyte makes use of Kubernetes Service Accounts to enable every control plane cluster to perform
authenticated requests to the data plane Kubernetes API Server.
The default behaviour is that the Helm chart creates a ServiceAccount
in each data plane cluster.
In order to verify requests, the Kubernetes API Server expects a signed bearer token
attached to the Service Account. As of Kubernetes 1.24 and above, the bearer token has to be generated manually.
Use the following manifest to create a long-lived bearer token for the
flyteadminService Account in your data plane cluster:kubectl apply -f - <<EOF apiVersion: v1 kind: Secret metadata: name: dataplane1-token namespace: flyte annotations: kubernetes.io/service-account.name: flyteadmin type: kubernetes.io/service-account-token EOF
Create a new file named
secrets.yamlthat looks like:
apiVersion: v1
kind: Secret
metadata:
  name: cluster-credentials
  namespace: flyte
type: Opaque
data:
Note
The credentials have two parts (CA cert and bearer token).
Copy the bearer token of the first data plane cluster’s secret to your clipboard using the following command:
kubectl get secret -n flyte dataplane1-token \
    -o jsonpath='{.data.token}' | pbcopy
Go to
secrets.yamland add a new entry understringDatawith the data plane cluster token:
apiVersion: v1
kind: Secret
metadata:
  name: cluster-credentials
  namespace: flyte
type: Opaque
data:
  dataplane_1_token: <your-dataplane1-token>
Obtain the corresponding certificate:
kubectl get secret -n flyte dataplane1-token \
    -o jsonpath='{.data.ca\.crt}' | pbcopy
Add another entry on your
secrets.yamlfile for the certificate:
apiVersion: v1
kind: Secret
metadata:
  name: cluster-credentials
  namespace: flyte
type: Opaque
data:
  dataplane_1_token: <your-dataplane1-token>
  dataplane_1_cacert: <your-dataplane1-token-certificate>
Connect to your control plane cluster and create the
cluster-credentialssecret:
kubectl apply -f secrets.yaml
Create a file named
values-override.yamland add the following config to it:
flyteadmin:
  additionalVolumes:
  - name: cluster-credentials
    secret:
      secretName: cluster-credentials
  additionalVolumeMounts:
  - name: cluster-credentials
    mountPath: /var/run/credentials
  initContainerClusterSyncAdditionalVolumeMounts:
  - name: cluster-credentials
    mountPath: /etc/credentials
configmap:
  clusters:
   labelClusterMap:
     label1:
     - id: dataplane_1
       weight: 1
   clusterConfigs:
   - name: "dataplane_1"
     endpoint: https://<your-dataplane1-kubeapi-endpoint>:443
     enabled: true
     auth:
        type: "file_path"
        tokenPath: "/var/run/credentials/dataplane_1_token"
        certPath: "/var/run/credentials/dataplane_1_cacert"
Note
Typically, you can obtain your Kubernetes API endpoint URL using the following command:
kubectl cluster-info
In this configuration, label1 and label2 are just labels that we will use later in the process
to configure mappings that enable workflow executions matching those labels, to be scheduled
on one or multiple clusters depending on the weight (e.g. label1 on dataplane_1). The weight is the
priority of a specific cluster, relative to the other clusters under the labelClusterMap entry. The total sum of weights under a particular
label has to be 1.
Add the
flyte-dataplane-roleIAM Role as thedefaultIamRolein yourvalues-eks.yamlfile. See section hereUpdate the control plane Helm release:
Note
This step will disable flytepropeller in the control plane cluster, leaving no possibility of running workflows there. If you require
the control plane to run workflows, edit the values-controlplane.yaml file and set flytepropeller.enabled to true and add one
additional cluster config for the control plane cluster itself:
configmap:
   clusters:
      clusterConfigs:
      - name: "dataplane_1"
        ...
      - name: "controlplane"
        enabled: true
        inCluster: true  # Use in-cluster credentials
Then, perform the helm upgrade operation.
helm upgrade flyte-core flyteorg/flyte-core \
--values values-eks-controlplane.yaml --values values-override.yaml \
--values values-eks.yaml -n flyte
helm upgrade flyte -n flyte flyteorg/flyte-core values.yaml \
      --values values-gcp.yaml \
      --values values-controlplane.yaml \
      --values values-override.yaml
Verify that all Pods in the
flytenamespace areRunning:
kubectl get pods -n flyte
Example output:
NAME READY STATUS RESTARTS AGE
datacatalog-86f6b9bf64-bp2cj 1/1 Running 0 23h
datacatalog-86f6b9bf64-fjzcp 1/1 Running 0 23h
flyteadmin-84f666b6f5-7g65j 1/1 Running 0 23h
flyteadmin-84f666b6f5-sqfwv 1/1 Running 0 23h
flyteconsole-cdcb48b56-5qzlb 1/1 Running 0 23h
flyteconsole-cdcb48b56-zj75l 1/1 Running 0 23h
flytescheduler-947ccbd6-r8kg5 1/1 Running 0 23h
syncresources-6d8794bbcb-754wn 1/1 Running 0 23h
Configure Execution Cluster Labels
The next step is to configure project-domain or workflow labels to schedule on a specific Kubernetes cluster.
Create an
ecl.yamlfile with the following contents:
domain: development
project: project1
value: label1
Note
Change domain and project according to your environment. The value has
to match with the entry under labelClusterMap in the values-override.yaml file.
Repeat step 1 for every project-domain mapping you need to configure, creating a YAML file for each one.
Update the execution cluster label of the project and domain:
flytectl update execution-cluster-label --attrFile ecl.yamlExample output:
Updated attributes from team1 project and domain developmentExecute a workflow indicating project and domain:
pyflyte run --remote --project team1 --domain development example.py training_workflow \ ✔ ╱ docs-development-env --hyperparameters '{"C": 0.1}'
Create a
workflow-ecl.yamlfile with the following example contents:
domain: development
project: project1
workflow: example.training_workflow
value: project1
Update execution cluster label of the project and domain
flytectl update execution-cluster-label \
      -p project1 -d development \
      example.training_workflow \
      --attrFile workflow-ecl.yaml
Execute a workflow indicating project and domain:
pyflyte run --remote --project team1 --domain development example.py training_workflow \ ✔ ╱ docs-development-env --hyperparameters '{"C": 0.1}'
Congratulations 🎉! With this, the execution of workflows belonging to a specific project-domain or a single specific workflow will be scheduled on the target label cluster.
Day 2 Operations
Add another Kubernetes cluster
Find in this section the necessary steps to scale out your deployment by adding one Kubernetes cluster. The process can be repeated for additional clusters.
Create the new cluster:
eksctl create cluster --name flyte-dataplane-2 --region <AWS-REGION-CODE> --version 1.25 --vpc-private-subnets <subnet-ID-1>,<subnet-ID-2> --without-nodegroupNote
This is only one of multiple ways to provision an EKS cluster. Follow your organization’s policies to complete this step.
Add a nodegroup to the cluster. Typically
t3.xlargeinstances provide enough resources to get started. Follow your organization’s policies in this regard.
Create an OIDC Provider for the new cluster:
eksctl utils associate-iam-oidc-provider --cluster flyte-dataplane-2 --region <AWS-REGION-CODE> --approveTake note of the OIDC Provider ID:
aws eks describe-cluster --region <AWS-REGION-CODE> --name flyte-dataplane-2 --query "cluster.identity.oidc.issuer" --output textGo to the IAM section in the AWS Management Console and edit the Trust Policy of the
flyte-dataplane-roleAdd a new
Principalwith the new cluster’s OIDC Provider ID. Include theActionandConditionssection:{ "Version": "2012-10-17", "Statement": [ { "Effect": "Allow", "Principal": { "Federated": "arn:aws:iam::<AWS-ACCOUNT-ID>:oidc-provider/oidc.eks.<AWS-REGION-CODE>.amazonaws.com/id/<DATAPLANE1-OIDC-PROVIDER>" }, "Action": "sts:AssumeRoleWithWebIdentity", "Condition": { "StringLike": { "oidc.eks.<AWS-REGION-CODE>.amazonaws.com/id/<DATAPLANE1-OIDC-PROVIDER>:aud": "sts.amazonaws.com", "oidc.eks.<AWS-REGION-CODE>.amazonaws.com/id/<DATAPLANE1-OIDC-PROVIDER>:sub": [ "system:serviceaccount:flyte:flytepropeller", "system:serviceaccount:*:default" ] } } }, { "Effect": "Allow", "Principal": { "Federated": "arn:aws:iam::<AWS-ACCOUNT-ID>:oidc-provider/oidc.eks.<AWS-REGION-CODE>.amazonaws.com/id/<DATAPLANE2-OIDC-PROVIDER>" }, "Action": "sts:AssumeRoleWithWebIdentity", "Condition": { "StringLike": { "oidc.eks.<AWS-REGION-CODE>.amazonaws.com/id/<DATAPLANE2-OIDC-PROVIDER>:aud": "sts.amazonaws.com", "oidc.eks.<AWS-REGION-CODE>.amazonaws.com/id/<DATAPLANE2-OIDC-PROVIDER>:sub": [ "system:serviceaccount:flyte:flytepropeller", "system:serviceaccount:*:default" ] } } } ] }
Install the data plane Helm chart following the steps in the Data plane deployment section. See section.
Follow steps 1-3 in the control plane configuration section (see section) to generate and populate a new section in your
secrets.yamlfileExample:
apiVersion: v1
kind: Secret
metadata:
name: cluster-credentials
namespace: flyte
type: Opaque
data:
dataplane_1_token: <your-dataplane1-token>
dataplane_1_cacert: <your-dataplane1-token-certificate>
dataplane_2_token: <your-dataplane2-token>
dataplane_2_cacert:  <your-dataplane2-token-certificate>
Connect to the control plane cluster and update the
cluster-credentialsSecret:kubect apply -f secrets.yamlGo to your
values-override.yamlfile and add the information of the new cluster. Adding a new label is not entirely needed. Nevertheless, in the following example a new label is created to illustrate Flyte’s capability to schedule workloads on different clusters in response to user-defined mappings ofproject,domainandlabel:abbr:
... #all the above content remains the same
   configmap:
   clusters:
   labelClusterMap:
      label1:
      - id: dataplane_1
         weight: 1
      label2:
      - id: dataplane_2
         weight: 1
   clusterConfigs:
   - name: "dataplane_1"
      endpoint: https://<DATAPLANE-1-K8S-API-ENDPOINT>.com:443
      enabled: true
      auth:
         type: "file_path"
         tokenPath: "/var/run/credentials/dataplane_1_token"
         certPath: "/var/run/credentials/dataplane_1_cacert"
   - name: "dataplane_2"
      endpoint: https://<DATAPLANE-1-K8S-API-ENDPOINT>:443
      enabled: true
      auth:
         type: "file_path"
         tokenPath: "/var/run/credentials/dataplane_2_token"
         certPath: "/var/run/credentials/dataplane_2_cacert"
Update the Helm release in the control plane cluster:
helm upgrade flyte-core-control flyteorg/flyte-core -n flyte --values values-controlplane.yaml --values values-eks.yaml --values values-override.yaml
Create a new execution cluster labels file with the following sample content:
domain: production
project: team1
value: label2
Update the cluster execution labels for the project:
flytectl update execution-cluster-label --attrFile ecl-production.yaml
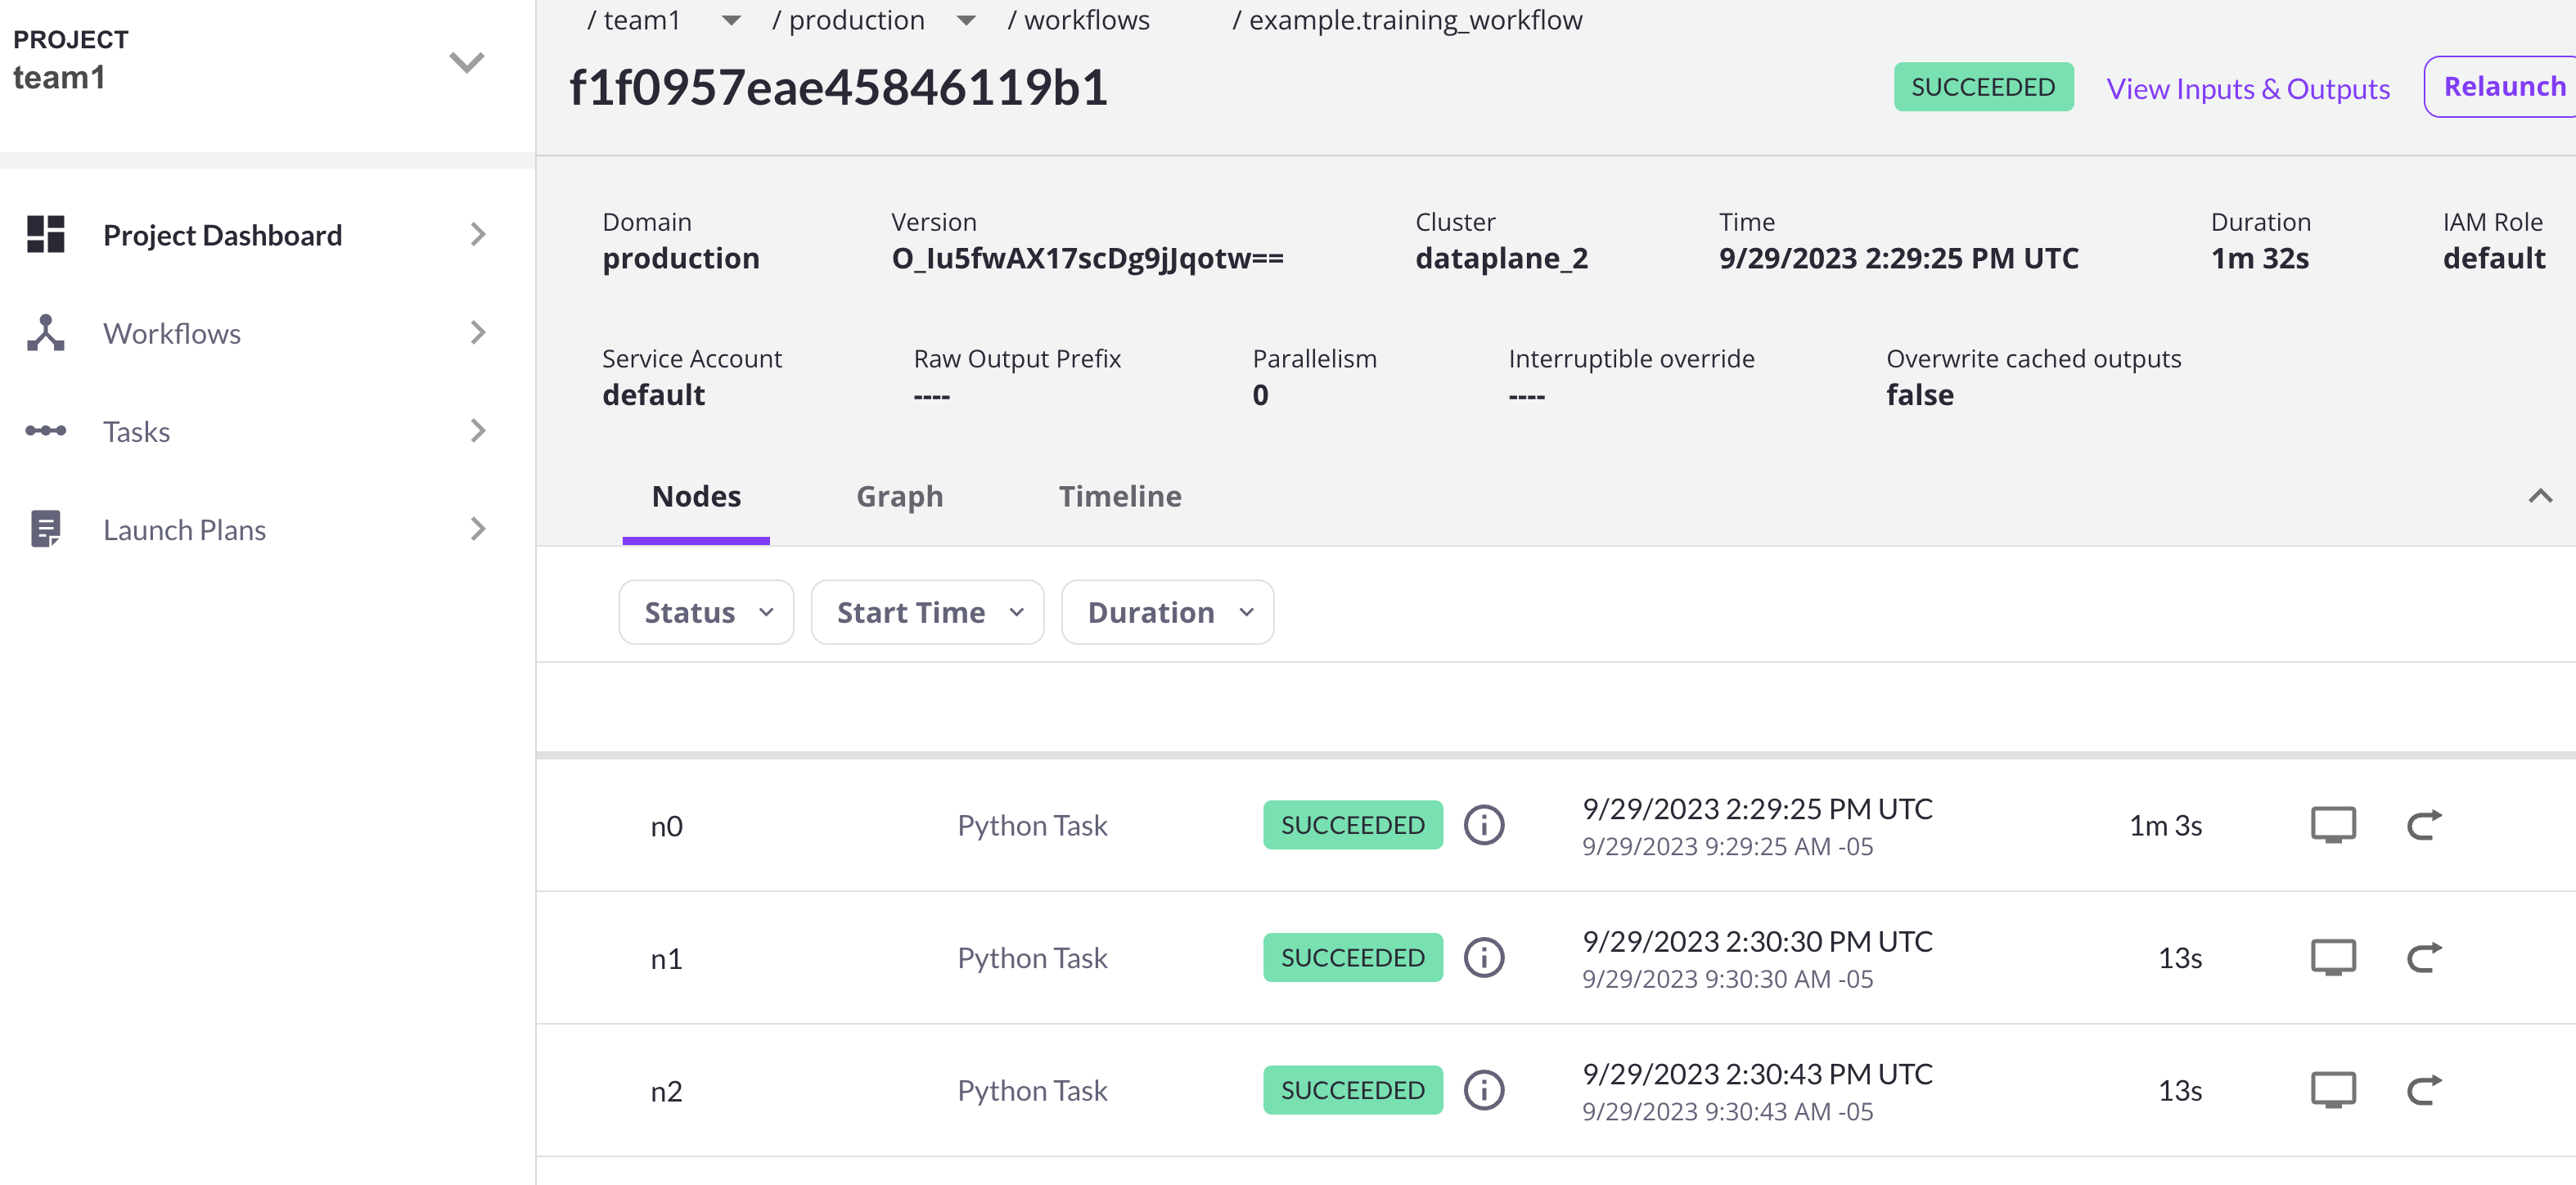
Finally, submit a workflow execution that matches the label of the new cluster:
pyflyte run --remote --project team1 --domain production example.py \
    training_workflow --hyperparameters '{"C": 0.1}'
A successful execution should be visible on the UI, confirming it ran in the new cluster: